Loading...

Update Yosemite OS X 10.10.3 Hackintosh on VMware with Windows 8.1 Works Fine

This post shows that updating the earlier version of Mac OS X 10.10 to latest 10.10.3 works fine on VMware virtualization software on Windows 8.1 or Windows 7 computer.  Since our earlier guide to install and run Mac OS X 10.10 Yosemite on VMware workstation uses the vanilla kernel (the original kernel from Apple), the upgrade to 10.10.3 on VMware Hackintosh worked well without any issues or kernel panics. Let us see the way of upgrading to the latest version.
The Mac OS X 10.10.3 comes with several improvements and changes. It could be the major update to original 10.10 rather than 10.10.1 and 10.10.2 updates. New Photo app, New Emoji, more iCloud options, Google 2-step verification and more changes are included in the OS X 10.10.3 update. While writing this post, the update is available as public beta only, but surely this method will work for final version too.  The desktop virtualization software VMware workstation 11 had been used for this demonstration purpose.

How to Update Mac OS X 10.10.3 on VMware Workstation

Upgrade can be done with combo or individual updates. Better check the requirements, that means which earlier version is required for particular update. Usually the combo update will have the all necessary previous updates from the major release which is Mac OS X 10.10 Mavericks.
1) Make sure you are having the Mavericks OS X on the VMware workstation which is installed with Vanilla kernel. You can refer our earlier guide here. It was upgraded from Mavericks pre install VMware image to latest version.
You will be needing to unlock the VMware workstation to be able to install and use Mac OS X as guest Operating Systems on VMware with Windows 8.1 or Windows 7 computer.
Here is the OS X version of 10.10.2 before the update.
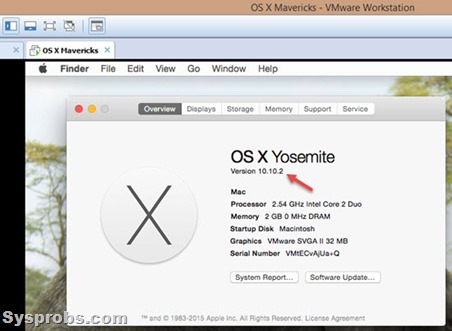
installed 10.10.2 on VMware
2) Take a snapshot of the virtual machine before proceeding the software update.
3) Use Apple App store to download and install the 10.10.3 Yosemite on VMware. The virtual machine needs to be restarted to continue the installation. Obviously the guest OS should have internet access to download the software update.
software update
4) As we said earlier, since the vanilla kernel had been used in the method without modifying or patching the original kernel, the software update will take place smoothly.
Here is the updated OS X 10.10.3 on VMware workstation on Windows 8.1 host computer.
updated OS X 10.10.3 on Vmware

How to Fix Display, Slow OS X  and Screen Lagging Issues On Yosemite VMware

There are some tweaks and workarounds available to fix the display issues when using this Hackintosh method on VMware workstation. Few users complained about screen lagging and very slow performance of virtual machine. Here are the few workarounds that could possibly fix the slow performing OS X virtual machine issue and improve the display performance.

a) Using Beamoff at startup

It’s a kind of script developed by Hackintosh experts to make the Yosemite virtual machine work better in VMware workstation, VM Player and even on ESX server.  You can download the file and find more information here about how to use beamoff on VMware virtual machine.
Here is the simple summary.
a.1) Download the beamoff and extract it. Make sure you have transferred the file inside the guest OS X.
a.2) It doesn’t need to be installed. This particular file should be added in startup of Yosemite OS X for the specific user. You can find further steps on Apple site here.
Once you have added, it should be like below.
add beamoff to startup in virtual machine
Restarting the Mac OS X 10.10.3 virtual machine after above changes will load the beamoff in the startup and help to solve the display and lagging issues in VMware workstation.

b) Installing the Latest VMware tools

VMware tools for Mac OS X guest on Windows host is not available since it doesn’t support Mac OS virtualization on Windows OS platform. But we can use the VMware tools which built for Mac OS X platform. Since the guest OS is same, installing the latest version of VM tools will help to some extend.
b.1) Download the latest VMware fusion tools for Mac OS X. Click here to download.
b.2) Extract the file inside OS X virtual machine. You will be finding darwin.iso inside “payload” folder.Execute the ISO file and install the tools in the guest virtual machine.
vmware tools for yosemite 10.10.3
With the above two methods, mostly the display lagging and slow VM performance issue will be fixed on Mac OS X 10.10.3.
Hope this guide would be useful to run the latest version of OS X 10.10.3 on VMware workstation with Windows 8.1 or Windows 7.

22 Easy and Free Steps to Make Windows 7 Faster & Faster

Make Windows 7 FasterHow to make Windows 7 faster? Here are the 22 easy and free steps to make windows 7 faster and faster. I combined these methods from my experience and experiments which worked much better in improving windows 7 performance.  These following steps can be done by any Windows 7 user and not required third party or paid software and extra technical knowledge.
Network is a major factor of deciding a OS speed. Slowness in networking directly affect speed of Windows 7. There for I have added some tweaks to improve windows 7 network performance also.
Continue reading the easy 22 ways to make windows 7 faster.

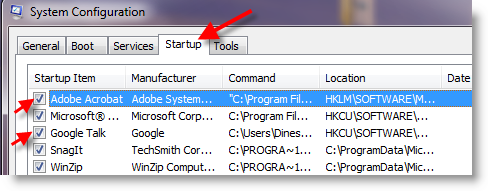
1)     Make Windows 7 Start up faster by removing unwanted programs and services from startup.

To do this type ‘ msconfig‘ in Run or Search box, go to Startup tab and uncheck programs and services not required during start up. The programs and services listed here start with Windows 7 every time so by removing them we can reduce Windows 7 startup time. Do not remove any necessary startup programs.
Make Windows 7 Faster

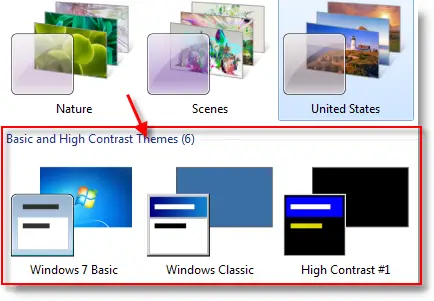
2)     Disable Aero Experience

If you are not an appearance lover but a performance lover then disable aero experience in windows 7. This method defiantly affects the performance of Windows 7. You can gain some physical memory and display card work load for programs by disabling aero.
Right Click on Desktop, go to Personalize then select any of ‘Basic and High Contrast Themes’.
Make Windows 7 Faster

3)     Increase Virtual Memory ( Paging File)

Windows 7 consumes more memory than Windows XP but lesser than Windows Vista. If you are a heavy computer user who open more programs and windows then you can increase Virtual Memory of Windows 7. Virtual memory works with physical memory ( RAM).  Hard disk space will be used as virtual memory to keep temporary information which very rarely use by programs and OS. By increasing Virtual memory in Windows 7 computer make sure programs and OS work smoothly.
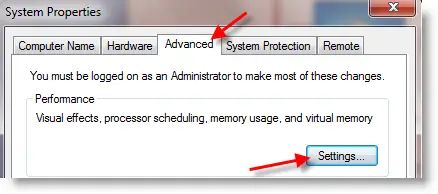
Right Click on My Computer, select Properties. Go to Advanced tab and click on setting button under ‘Performance’.
Make Windows 7 FasterGo to Advanced tab in next window, press change button under virtual memory.
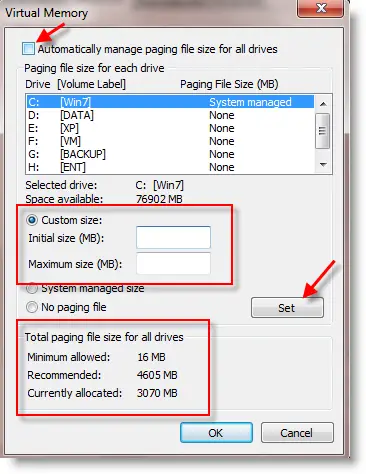
Here you can see the current virtual memory size. Virtual memory called ‘paging file’ also.
In next screen under custom size enter size you want to allocate for virtual memory (paging file). It depends on your hard disk size and physical memory.  Make sure it’s not less than system recommended size. Normally recommended paging file is 1.5 of physical RAM. In this example recommended size of virtual memory is 4605MB because my windows 7 RAM is 3GB. So, enter 4605MB in Initial size and Maximum Size fields.
Make Windows 7 Faster
Press Set button, you may need to restart computer.

4)     Disable Visual Effects

Again if you are not an appearance lover of Windows 7 then disable visual effects. It will reduce the load on RAM and VGA.
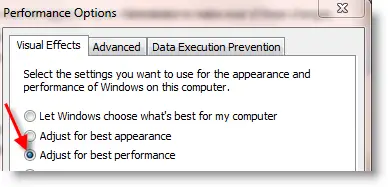
In same settings tab under performance (mentioned in step 3), go to Visual effects and set for Adjust best performance.  It will bring all visual effects to very standard level, but to better performance.
Make Windows 7 Faster

5)     Windows 7 Disk Clean up

Remove unwanted and temporary files on your Windows 7 disks. It reduces access time on system and your files to make Windows 7 faster.
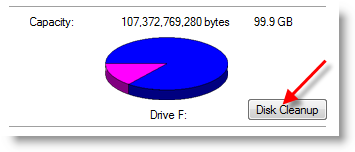
Right click on each disk, go to properties and press Disk Cleanup button. In next screen you can select file types to delete and start clean up.
Make Windows 7 Faster

6)     Defragment disks

Defragmentation helps to improve access time for each file by managing  free space and arranging file locations on disks. It’s recommended to run defragmentation tool very frequently especially when you have lot of data. In our case after deleting unwanted files by disk cleanup in previous step run defragmentation now.
Go to Properties of each disk, select defragmentation under tools and start. Defragmentation takes time depends on size of partition and data.

7)     Run Error-Checking on disks

This is another method to improve performance of disk. It will check and correct any system files or physical disk errors on Windows 7 computer.
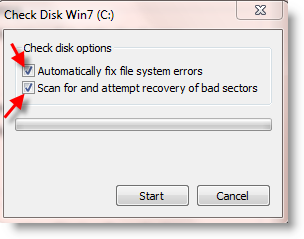
Select Error-check under tools in each disk with both options selected. If the particular partition is a system, boot or having paging file then error-checking will start in next boot.
Make Windows 7 Faster

8)     Disable Side Bar (Gadgets)

If you don’t use side bar and gadgets in windows 7 then remove them. This helps to gain some resources on RAM, Network and Processor. Read more about Windows 7 side bar gadgets and how to remove them.

9)     Disable Windows Defender

When you use third party protection software such as Norton, AVG, MacAfee…etc, then disable windows defender. It does almost the same job. So it’s not required to run two similar programs in same time which is a unwanted system load for Windows 7.
You can disable Windows defender in control panel.

10) Disable UAC

UAC (User Access Control) is a window pop ups for administration tasks and requires action.UAC in Windows 7 does not irritate you as Windows Vista, but still you can work faster if you disable UAC.

11) Make Window 7 shutdown faster

You can make windows 7 shutdown faster by editing one registry key.  Read more here about editing registry key and make windows 7 shutdown faster. I consider this step also to make windows 7 faster.
Setting it to a lower 4 digit value, (say 5000) will make your PC shutdown faster, but you could end up losing data.

12) Disable Autotuning in Windows 7 Network

This option helps lot in Windows 7 network. If you face slowness in windows 7 network then you must do this.

13) Remove RDC to improve Windows 7 Network

Remove RDC additional network feature to improve data transfer speed over windows 7 network. Read more here

14) Remove IPv6

Remove IPv6 from Windows 7 network adapter settings if it’s not required.  If you are not using IPv6 in internal or external networks then remove IPv6 to improve Windows 7 network performance.

15) Compatibility of drivers and programs

Before install any drives or programs make sure it’s compatible with Windows 7. It should be officially supported for Windows 7. Installing non compatible drivers and programs on Windows 7 may cause problem with system performance and crash your system.

16) Disable Indexing (Windows Search) in Windows 7.

Indexing in Windows 7 made for improve speed of Windows search. When you search a file or folder on windows search, if it’s already indexed by indexing service then results will appear immediately from indexed cache.
When you use third party indexing search programs such as Ava Finder, Google Desktop then disable windows 7 indexing service. This method avoids two programs to index your whole data and slow down disk performance.
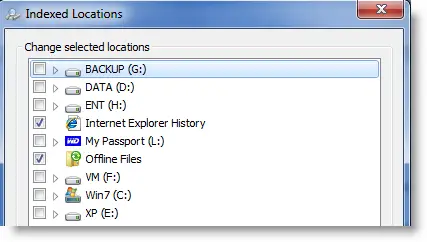
You can find out indexing options in Control Panel -> Indexing Options -> Modify button.
Make Windows 7 Faster
Also windows search service can be disabled in Computer Services.  Go to Computer Management, Services and look for ‘Windows Search’. Set Disable to startup type and Click Apply.

17) Sync Centre Synchronization

If any network shares set to sync with your windows 7 and while it’s happening in background it affects your system very much.  During this time network and disk activity will be very high and you can’t make it out. Two options are available to avoid this issue.
a)      Remove the sync partnership.
b)      Let synchronization complete fully without any errors.
Sync Center is located in Control panel.

18) Remove Unwanted Programs

Some time we install programs for testing purpose or for one time use only. You can uninstall these type of old and unwanted programs from windows 7 computer. Even though you are not using these programs but some services and system files of these programs load in Windows 7 all the time. By completely uninstalling these unwanted programs on your computer help to improve system performance.  Programs can be uninstalled from control panel.

19) Speed up Menu Show delay time in Windows 7

Editing a registry key speeds up menu show time in Windows 7.  I suggest trying manual registry editing (2nd)method available here. So next time menus will appear more quickly than earlier and improve windows 7 performance.

20) Change the power plan to maximum performance.

This method mostly suitable for laptops. If you don’t run on battery most of the time then change the power plan to maximum performance.  This can be done in desktop computer also. To do it, go to control panel, power options and select ‘ High Performance ‘ plan and press OK.

21) Virus check with Microsoft Security Essential

Make sure your windows 7 computer is virus free. Viruses make any computers slow by giving additional work to processors, memory and disks. You can run virus check and clean viruses by free antivirus software ‘Microsoft Security Essential’ from Microsoft. Download Microsoft Security Essential here and run a scan.

22) Malicious software check and Removal

Check your Windows 7 computer for infection by specific, prevalent malicious software (including Blaster, Sasser, and Mydoom) and remove the infection if it is found.
Download the free latest malicious removal software for Windows 7 from Microsoft and scan now.  By removing malicious software you can improve windows 7 speed.
The above 22 free and easy tips make windows 7 faster and faster. I combined above steps which really worked in my experience and experiments.  You can find similar articles to make windows 7 faster if I miss anything in above list.

Speed Up Windows 8 and 8.1 – Master Tutorial to Make Windows 8 and 8.1 Super Fast

UPDATE: This tutorial will also work for Windows 8.1.
Finally the wait is over. Many AskVG readers who have started using Microsoft's latest OSWindows 8 were requesting us since long time to post our exclusive master tutorial to make Windows 8 super fast just like we posted similar tutorials for previous Windows versions in past. You can find them at following links:
This exclusive master tutorial series is one of our best and most popular articles and today in this article we are going to add another tutorial to this series.
Today we are going to share a detailed guide which will help you in making Windows 8 fasterand improve your system performance. It'll help you in disabling unnecessary eye candy effects such as shadows, animations, etc. Also you'll be able to disable unwanted programs and services which start automatically with Windows.
So if you want to tweak Windows 8 and want to make it super fast, check out following simple steps:
STEP 1: Apply Registry Tweaks
We are providing a ready-made Registry script in this step which will tweak some settings in Windows 8 Registry to make Windows faster. It'll reduce timeout values, set Windows to automatically end not responding tasks, make menus to show faster upon clicking and tweak various other settings.
Simply download the zip file given in following topic, extract it and you'll get "Registry Tweaks to Make Windows Faster.reg" file. Run the file and it'll ask for confirmation, accept it:
The zip file also contains an uninstallation registry script to restore all default settings.
STEP 2: Customize System Properties to Disable Shadows and Animations
By default Windows shows many eye candy effects such as animations, shadow effects, etc to enhance user interface. You can turn off these kind of effects to speed up system performance.
1. Press "Win+R" keys together to open RUN dialog box. Now type sysdm.cpl and press Enter. It'll open System Properties window.
2. Now go to "Advanced" tab and click on "Settings" button present in "Performance" section.
3. It'll open a new window. Now uncheck following options:
  • Animate controls and elements inside windows
  • Animate windows when minimizing and maximizing
  • Animations in the taskbar
  • Fade or slide menus into view
  • Fade or slide ToolTips into view
  • Fade out menu items after clicking
  • Save taskbar thumbnail previews
  • Show shadows under mouse pointer
  • Show shadows under windows
  • Show translucent selection rectangle
  • Slide open combo boxes
  • Smooth-scroll list boxes
Disable_Windows_8_Start_Screen_Animation.png
4. Apply the changes and close the window.
STEP 3: Change Folder Options to Disable Unnecessary Features
You can disable a few features of Windows Explorer such as tooltips, etc to improve Explorer functionality:
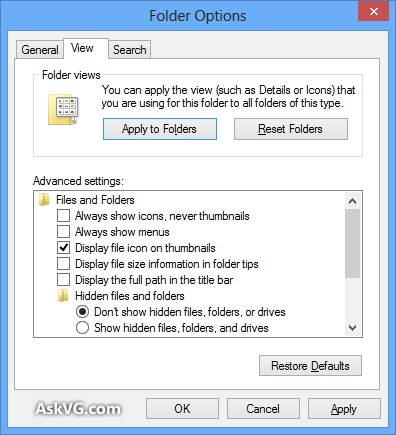
1. Open My Computer and click on "View" tab present in the Ribbon. Now click on "Options" button present at the end to open Folder Options window.
2. Go to "View" tab and uncheck following options:
  • Display file size information in folder tips
  • Hide empty drives in the Computer folder
  • Hide extensions for known file types
  • Show encrypted or compressed NTFS files in color
  • Show pop-up description for folder and desktop items
Customize_Windows_8_Folder_Options.png
3. Apply changes and close the window.
STEP 4: Disallow Unnecessary Windows Services to Start Automatically
There are many built-in services in Windows which automatically start with Windows and always run in background even if the system doesn't need them. You can disallow many unnecessary services to start automatically with Windows to improve system performance.
Check out following tutorial to learn which services you should disable in Windows 8:
STEP 5: Disable Unnecessary Programs from Windows Startup
Many 3rd party software add their entries in Windows startup list so that they can automatically run as soon as Windows starts. Many of those startup items are unnecessary and can be removed from startup list to speedup Windows.
Follow these simple steps to disable unwanted startup items in Windows 8:
1. In previous Windows versions the startup items list was present in system configuration manager which can be accessed using msconfig command. But Microsoft has moved the startup items list in Windows 8. Now it can be accessed using Task Manager.
Right-click on Taskbar and select "Task Manager" option. Alternatively, you can directly open Task Manager by pressing "Ctrl+Shift+Esc" keys together.
2. Now go to "Startup" tab and here you can click on the unwanted item and click on "Disable" button to remove it from startup.
Customize_Windows_8_Startup_Items.png
Now the disabled program will no longer run whenever you start Windows. It'll only run if you launch it manually.
STEP 6: Remove Sound Notifications of System Events
By default Windows plays sounds for various system events such as error messages, device connect, device disconnect, command success, battery status, UAC prompt, etc.
Sometimes many of these sound notifications might cause a little bit slowness in your system. If you have a slow computer system, you can disable some or all sound notifications in Windows 8 to speedup your computer system:
1. Open Control Panel and click on Sound icon. Alternatively, you can directly open it usingmmsys.cpl command.
2. Once you open Sound window, go to "Sounds" tab. Here you can click on desired program event which you want to disable and then select "(None)" from "Sounds" drop-down list.
Customize_Windows_8_Sound_Scheme.png
If you want to disable all sound notifications, select "No Sounds" from "Sound Scheme" drop-down box.
3. Apply the changes and close the window.
STEP 7: A Few More Things to Do to Make Windows 8 Faster
After following all above mentioned steps, you should be able to notice big improvement in your system performance. Apart from these steps, you should also do following things regularly:
  • Download and install latest updates using Windows Updates
  • Use latest drivers for your computer hardware
  • Install only necessary software
  • Stay away from transformation packs! Install skins packs recommended by us only
  • Use a good antivirus and keep it updated
That's all for now. If you have any suggestion or query, feel free to share it in your comment...

How to Recover Deleted Contacts from Android

Android is becoming more and more popular for its openness and rich features, there are many brands mobile phone running Android as operating system, such as Samsung, HTC, Motorola, Sony, LG and more. However, as far as I'm concerned, many Android users feel depressed when all of their phone contacts have been erased or lost after wiping phone or buying a new one. Is there any solution to restore all your lost contacts back?
Yes, of course you can restore all deleted contacts from your Android phone with the Android recovery tool - Android Data Recovery, it allows you to recover deleted contacts directly from Android or SIM card on Android phones. With this marvelous software, you can get back messages, contacts, videos, photos and more from Android phone without quality loss.
Now let's go throught how to retrieve lost contacts from an Android phone, but you need to free download the program on your computer first.


Steps to restore deleted contacts from an Android phone

Step 1 Prevent Your Data from Being Overwritten
Once your Android data get lost, no matter Samsung, HTC, LG, Sony or Motorola, you should stop operating your Android for adding or deleting Android data. For once you update those data, the Android backup file will be overwritten and what you lost can never be restore back.

Step 2 Install and run the Android recovery tool 
To begin with, install and launch the program on your Window or Mac computer.

Step 3 Connect Android to computer and enable USB debugging
Then connect your Android phone to computer and check if you have enabled USB debugging on your Android phone. If not, follow the ways below; If you did, you can move to the 3rd step now.

1) For Android 2.3 or earlier: Enter "Settings" < Click "Applications" < Click "Development" < Check "USB debugging"
2) For Android 3.0 to 4.1: Enter "Settings" < Click "Developer options" < Check "USB debugging"
3) For Android 4.2 or newer: Enter "Settings" < Click "About Phone" < Tap "Build number" for several times until getting a note "You are under developer mode" < Back to "Settings" < Click "Developer options" < Check "USB debugging"

enable-android-usb-debugging

Android Data Recovery empowers you to seletively choose which type of files to be scanned. If you want to recover Android contacts only, you can tick "Contacts" because it takes less time to scan only contacts than scan all the data. 

Restore Android Deleted Data

Also, to save time, you can choose only scan the deleted Android files as below:

Extract Deleted Data with Android Data Recovery

Step 4 Begin to scan your Andorid for lost contacts
Now you are in step 3 - Device Detected, that means your Android has been detected by the program successfully. Here, you just need to click "Start" to analyze your Android device and wait for a few seconds.

When below window comes to you, you need to turn to your Android phone and click "Allow" popping up on the screen, until it disappear, and then back to the program and click "Start" to scan your Android for lost contacts.

Extract Android Data with Android Data Recovery

Step 5 Preview and restore contacts on Android
After all contacts and messages have been scanned out, the program will remind you stop the scan, because it is a waste of time to scan all data. Then you can preview all contacts one by one in the scan result, mark those you want and click "Recover" to selectively save them on your computer.

Recover Contacts from Android Phone

Note: Contacts found in the scan result contain those you deleted recently (displayed in orange) and those existing on your Android phone (displayed in black). You can separate them by using the button above: Only display deleted items.

Step 6 Back up Your Android Device from Time to Time
To form a habit of back up Android files from time to time is with no doubt a good thing. Once you deleted your Android data accidentally, you can just use Android Data Recovery to retrieve deleted data from Android. By the way, here is a useful Android tool for you to back up Android data - Android Transfer. With it, you can easily back up your Android data etc. back to your Android.

How to Recover Lost Data from Android

Easy steps to recover deleted files from Android phone

Step 1 Stop Updating Your Android Once Lost Precious Data
If your Android data is lost, stop adding or deleting any data of your Android. If not, your Android data will be overwritten. That is, all your lost data cannot come back to you any more. So, make sure not to update your Android as long as your data get lost.

Step 2 Run the Android Data Recovery 
Install the program on your computer and run it, you will be asked to connect your Android device to PC via USB.

Step 3 Set up Android to enable USB debugging 
After connectting your Android to the computer, go to the step 2 - Enable USB debugging. Here you have three ways to do it according to different Android OS version:
1) For Android 2.3 or earlier: Enter "Settings" < Click "Applications" < Click "Development" < Check "USB debugging"
2) For Android 3.0 to 4.1: Enter "Settings" < Click "Developer options" < Check "USB debugging"
3) For Android 4.2 or newer: Enter "Settings" < Click "About Phone" < Tap "Build number" for several times until getting a note "You are under developer mode" < Back to "Settings" < Click "Developer options" < Check "USB debugging"

connect-android-to-computer

In the latest version of Android Data Recovery, you are empowered to seletively choose which type of files to be scanned.  If you want to recover all type of files, you can just skip it and move on.

Restore Android Deleted Data

Besides, you are also allowed to recover only the deleted data or to recover all the data. Choose a storage scanning mode:

Extract Deleted Data with Android Data Recovery

Step 4 Start scanning your Android for deleted files
Once you enabling USB debugging for your Android, it will be detected by the program. Then click on the green button "Start" to anaylize your Android data.

When you see the window below, it is time for you moving to your Android device again, tap on the "Allow" icon, then turn back to the computer and click on the "Start" button to continute.

Recover Deleted Data from Android

Step 5 Preview and recover contacts, messages, photos and video from Android
As you can see, this Android Data Recovery can recover data including text messages, contacts, photos and videos from your Android device. But you can only preview messages, contacts and photos now. 
At the last step, check and mark those you want and click "Recover" to save them to your computer.

Recover Data from Android

Step 6 Back up Your Android Device to Protect the Files
Do back up with your Android device from time to time. Therefore, you don't need to worry about losing data and then have no way to recover them. Later that day, if your Android data get lost, you can restore your deleted Android data back from the previous backup with Android Data Recovery. You can try Android Transfer, which allows you to back up your Android phone easily.

Perfectly done. Android Data Recovery help you restore all lost text messages, contacts, photos and videos back on your computer in above four steps. In the near future, you should learn to back up all Android data to computer so that you can find them back once you lose them again.
Older Posts
© Copyright complexpc | Designed By FULE HOPLITE
Back To Top